On this page you'll find different examples of doors and traps that you can use or modify for your own adventure level. Each example has a list of used objects. Use the quickadd button to add these objects (space button on PC) or drag them from the box on the right side of the screen. To attach cables between objects, double click them and drag.
Example level with all contraptions included
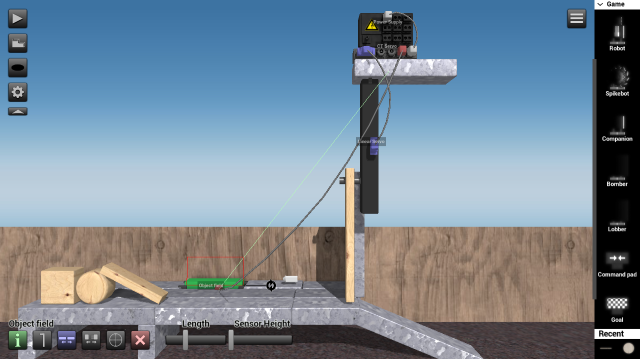
This door is closed until the player presses a button (See door example 1).
Objects used:
Begin by increasing the size of the Linear Motor, flip it over (marked button on screenshot), then attach it to a Platform object or wherever you want your door. Attach the plank on the Linear Motor as shown on the screenshot.
Add a Power Supply and a CT Servo on top of the Platform. The CT Servo is a controller we can use to control the state of the Linear Motor.
Attach a cable between the Power Supply and the CT Servo and then a cable between the motor and controller.
Add a Button somewhere and drag a cable to the CT Servo (IN1 socket).
When the player presses the button by shooting or touching it the door should open.

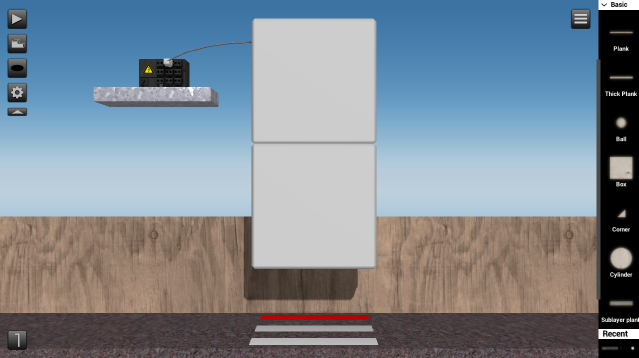
This door is closed until the player uses the Builder tool to place an object of specific type over an object field (See door example 2).
Objects used:
Attach a Linear Servo to a platform, increase its size and toggle the axis rotation. Connect it to a CT Servo and then connect the CT Servo to a Power Supply.
Add an Object field somewhere. Click it and use the crosshair button to select an object, for example the box. You can put some other objects beside it so that the player is forced to try them out to see which one is correct. Connect the Object field to the CT Servo.
Add an Item found in the Game category, then click its configuration button and choose Builder. That's an item the player must pick up before they can move the box.
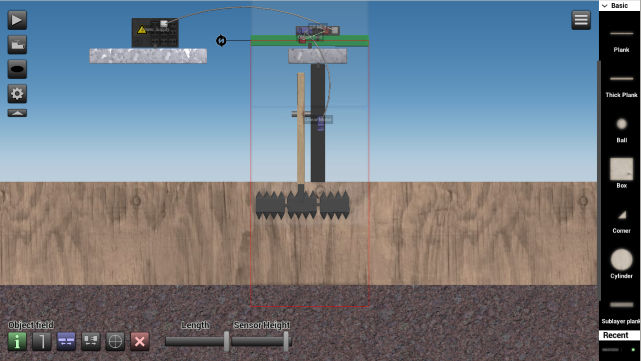
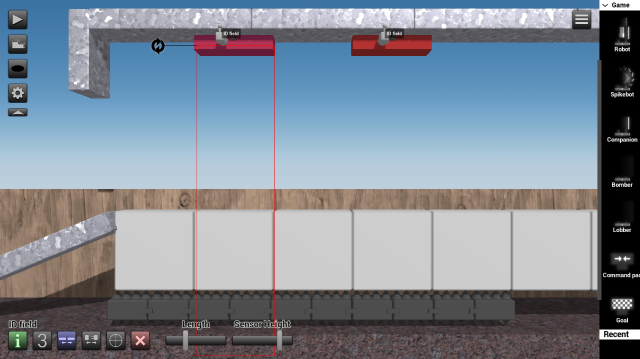
The player is instantly killed by spikes if they walk under this hidden trap (See trap example 1).
Objects used:
Add a Linear Motor, increase its size, flip it over and attach it to a platform. Attach 3x spikes to a plank as shown on the screenshot below, then attach the plank to the Linear Motor.
Connect the Linear Motor to the CT Mini and connect the CT Mini to a Power Supply. The CT Mini is a controller that controls the speed and direction of a motor. It will be set so that the trap is in a reversed state by default and then pushed down when the player walks under it.
Attach an Object field to the platform and point it downwards, adjust the length to cover the whole trap and the sensor height all the way down to the ground as shown on the screenshot, then connect it to the CT Mini (IN2 - reverse socket).
Add 2x maximum sized pixels on layer 2 in front of the trap to cover it. Then one maximum sized pixel for each layer below the trap, the one under the trap should be colored red as a warning (layer 1 in this case).
The player must jump between platforms on different layers or they will be killed by lasers (See trap example 2).
Objects used:
Attach lasers on the platforms, pointing sideways toward other platforms. These laser objects will damage robots if the wavelength is set above 0. Set it to maximum.
Add smaller platforms above the laser beams, one for each layer. The player must jump on these to get past the trap.
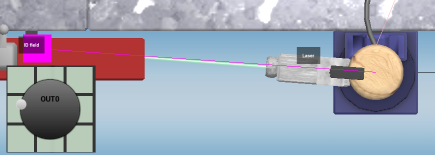
Certain pixel objects disappears if the player walks or jumps over them. (See trap example 3).
Objects used:
Attach a bunch of large pixels beside each other. Add platforms above the pixels as shown on the screenshot. Add two ID fields above two of the pixels, adjust the length and height so that the two pixels are covered.
An ID field reports when a specific object is inside the field. To select the player robot as the target, click the crosshair button when an ID field is selected and then use it on the robot.
Add two Mini transmitters and click the configuration button to set the used frequency to a random number, 20 for example. Now open the configuration window for the two pixels under the ID fields and set the opacity to the same number as the frequency used for the Mini transmitters.
Attach the Mini transmitters to the ID fields and the trap should work. If you want this to be a deadly trap you can put spikes under it (see screenshot).
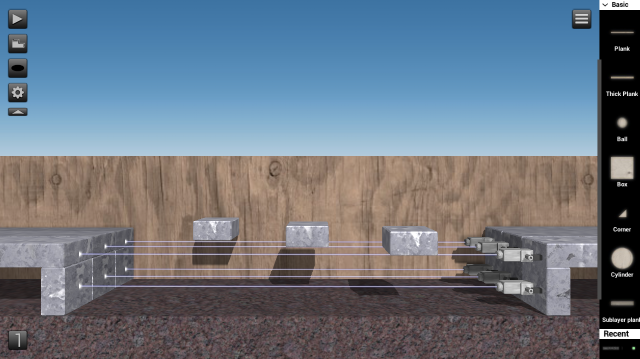
This trap shoots land mines until it's unactivated by a controlled laser beam. (see trap example 4).
Objects used:
Attach two Mini emitters to platforms and point them downwards. Click the Mini emitter's crosshair button to select a Land mine as the used object. Adjust the interval a bit if you want it to shoot faster.
Attach the laser to a small sized cylinder, then attach the cylinder to a Servo Motor. Add a CT Servo, connect it to a Battery and then connect the Servo Motor to the CT Servo.
Add the RC Micro somewhere that the player can use. Click the configuration button and drag out a round button. Connect the RC micro to the CT Servo.
Place a Laser bouncer and a Laser sensor somewhere. The laser beam from the controlled laser should be pointed by the player toward the Laser bouncer and then bounced to the Laser sensor, see screenshot for example. You might need to change the layer.
Connect the Laser sensor to an Inverter. The Inverter is then connected to the Mini emitters so that they shoot by default and are inactivated when the Laser sensor detects a laser beam, but since the Inverter only have one output socket and we're using two Mini emitters we will have to first connect it to a Y-splitter.
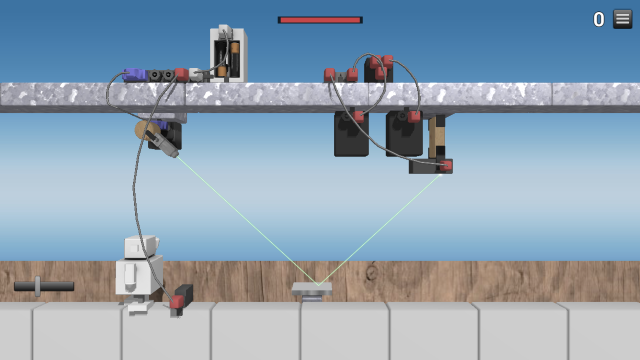
Note: when you click the Servo Motor make sure the little square is aligned together with the attached laser and the round button.
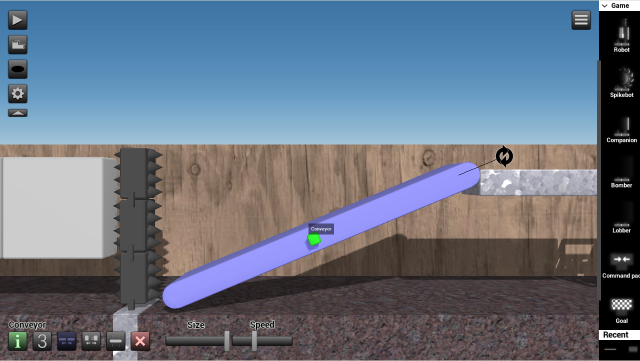
A simple trap that tries to move the player into a spikey wall (See trap example 5).
Objects used:
Add the Conveyor between platforms, rotate it a bit, adjust its size and adjust the speed so that it forces the player to move quickly. Build a wall of spikes as shown on the screenshot. Attach a jumper to the conveyor and it should work. A jumper is plugged into a signal socket to set the signal to a constant value, which can be configured but not in this example.
This trap forces the player to use the builder tool to avoid getting thrown into the roof of spikes from when trying to get past the fan system (See trap example 6).
Objects used:
Build a frame of platforms as shown on the screenshot. Add some boxes and a Builder item somewhere. Add a Power Supply, adjust the voltage to maximum and connect it to a bunch of fans that points toward a roof with spikes.
The fans will fling the player into the air so they can get up on the next platform but it should be built so that it's impossible to get past without first attaching the boxes under the spikes using the builder tool.

For more examples of contraptions that you can use in your adventure level, see part 2 of this tutorial:
